
Quick Jump To Guide:
Create an Invoice
Assign a Contact
Add Inventory or Services to the Invoice
Add Taxes or Fees
Add or Process Payment
Share an Invoice: Export, Email, or Print
Create an Invoice
There are many different ways to create an invoice in ArtCloud! We can start by going to the Invoices tab from our Navigation on the left and select Create Invoice in the top right corner:-gif.gif?width=688&height=387&name=2024-09-24_17-25-07%20(1)-gif.gif)
As you create your Invoice, the platform will auto-save your progress!
Assign a Contact
When building out an invoice, it's important to assign a Contact to the sale. In ArtCloud, this sale will be linked to the Contact's record, ensuring that both the transaction details and any future payments are accurately tracked. Type in the name of your Contact in the Contact field. If your Contact doesn't exist in ArtCloud currently, that's ok! Add them in when you see the dropdown item, "Add CONTACT NAME as a new contact":-gif.gif?width=688&height=385&name=2024-09-24_17-30-25%20(1)-gif.gif)
Note: If you need to display Billing or Shipping Address information, click on the blue linked Edit contact under your Contact's name at the top of the invoice. You'll be able to choose this Billing and/or Shipping Address and assign on the Invoice.
Add Inventory or Services to the Invoice
Once we've assigned our Contact, we can now add in the inventory or service line items for the sale. Click on the blue plus button to add these. With Inventory, you'll see a modal of your Active works available to be added to the invoice. You can search and filter for the work(s) you're looking to sell, select them, and then add them to your invoice:-gif.gif?width=688&height=384&name=2024-09-24_17-43-31%20(1)-gif.gif)
Note: The Title Catalog option is directly associated with the Edition Sets created in your account. You can choose an Edition from the Title Catalog to add onto your Invoice in order to keep your Edition Set available to purchase from. Learn more about Edition Sets here.
Pro Tip: Service line items are usually related to custom sale items, like Frames, Handling fees, or items that don't need to be an individual inventory record.
Add Taxes, Fees, and any other Details
If we scroll down towards the bottom of our Invoice, we'll see a section to start adding important fees like Shipping, Taxes, or even a Discount on the sale. You can also add in Invoice Comments that should appear on your Invoice to your Customer. The platform will auto calculate any tax or shipping into the Subtotal value of your line items:-gif.gif?width=688&height=385&name=2024-09-24_17-52-00%20(1)-gif.gif)
Pro Tip: Make sure to add in your Default Tax Rate and Default Invoice Comments to ensure you don't have to add these to your Invoice every single time! You can always overwrite these default values in the future at the individual invoice level.
Add or Process Payment
After you've added in all of the Inventory items, Service items, any taxes or shipping fees, you can now process your payment, record your payment, or share a Remote Pay Link with your Contact.-gif.gif?width=688&height=385&name=2024-09-24_18-05-22%20(1)-gif.gif)
You'll have the ability to adjust the Amount you're charging your customer on the payment modal seen above. If you are looking to process or record the total Amount, enter in the credit card details or record your payment via the Add Payment button. Once the Balance Amount is completely paid, you'll see the Invoice status change from Open to Closed.-gif.gif?width=688&height=385&name=2024-09-24_18-14-58%20(1)-gif.gif)
If Stripe is integrated on your account, you can use Stripe to process the payment directly in your account or via the Remote Pay Link. You will see a Credit/Debit option under Payment Type as a default when adding your Payment.
If Stripe is not integrated on your account, you can record your payment on the invoice using the Other Payment Type. Without Stripe integrated, you will only see the Other option as a default on the payment modal in your account.
Pro Tip: You will not be able to use the Remote Pay Link or process real funds without Stripe being integrated on the account.
To learn more about and/or integrate Stripe Payment Processing in your ArtCloud account, click here.
Share an Invoice: Export, Email, or Print
Now that we've recorded the full payment (or partial payment) on the invoice, we can share this with our Contact. You can Export the invoice to a .PDF, Email the invoice to your Contact, or Print the invoice. You can see these quick actions on the right side of the Invoice: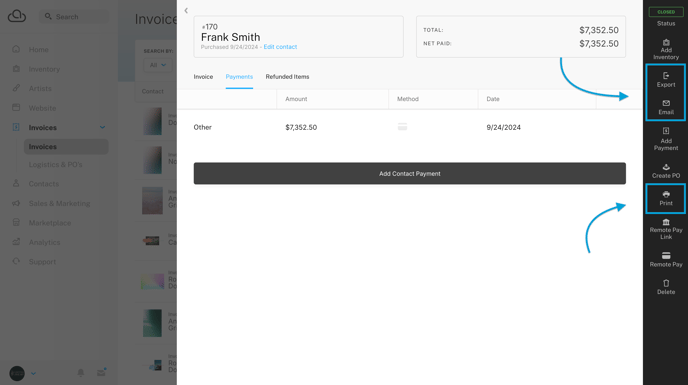
Important: Our team understands that every business or individual may have different and specific needs around processing sales, questions about Stripe Payment Processing, or concerns around payment situations. If you have a nuanced situation that you need assistance with, please make sure to reach out to our team in ArtCloud Support!